Managing Skills / Interests using the Assign Groups / Skills Screen
Once you have finished Adding, Editing, and Deleting Skills / Interests, you will want to assign those Skills to the people in your database. To assign several people to one skill, use the Assign Groups /Classes & Skills / Interests screen. (To assign several Skills / Interests to one person's record, see Managing Skills / Interests from Individual Record instead).
- From The Initial Portal of Church Windows choose Membership
- Click Groups / Skills in the Button Bar at the top of the screen
- Click Assign Skills
- You will automatically be on the Skills / Interests tab:
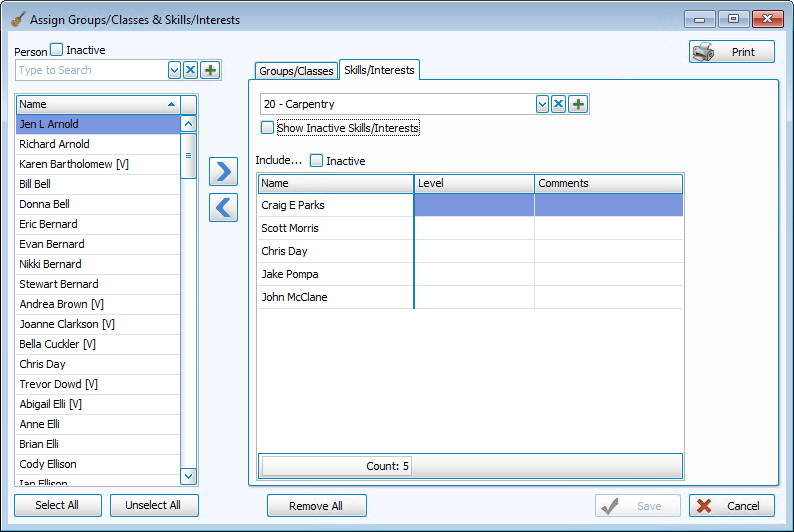
- Choose the Skill / Interest you want to assign from the
 dropdown. (Or, to add a new skill, click the
  Add Skill button, then create the new skill's code and definition.)
 - On the left side of the screen, there will be a list of all individuals in your database.
- At the right of the screen, there will be a blank list for you to fill with people who have that skill. (If there are already people who have this skill assigned, their names will appear in the list on the right.)
- Add a person to this skill, either:
- Double-click that person's name or click the name to highlight it.
- Then click the
 right button.
 - That person's name will now appear in the list on the right.
- In the Person field above the list of names, begin typing a person's last or first name.
- The list will scroll to highlight the closest match to the name you are typing.
- Continue typing until the correct name is highlighted or scroll and click to highlight the correct person.
- Press ENTER or click their name to add that person to the list.
OR
- Select All
If you wish to add every person in the left column to this skill, click this button and then click the right button. - Remove a person from the list of skill members:
- Click the name in the right column to highlight it
- Then click the
 left button.
- Remove All
To remove all skill members from this skill (i.e., to empty the list on the right), click the button. - Other information you may wish to record:
- Level
is a List field that you can use to indicate any additional information
about this person’s skill or interest. You may then
later create reports limited to only those with a certain level.
For example, if the Skill / Interest is "Vocal Music", you could use the Level column to indicate what choir part they sing: S for Soprano, A for Alto, etc.
- Comments is a Character field. There is no other standardization to the Comments area. You may use this for whatever comments you wish.
- Level
is a List field that you can use to indicate any additional information
about this person’s skill or interest. You may then
later create reports limited to only those with a certain level.
- Continue in this manner until you have entered as many skill members as you wish.
- Click Save and the information for this Skill / Interest will be saved, and this Skill / Interest will now appear on all of these peoples' individual records.
Note:
The items in any list can be sorted either by the code or the description; the default is code for most fields. When viewing the list of codes and their descriptions,
click on the header of the column by which you would like to sort the list (either the code or description) and a small, upward arrow ![]() will appear. This will automatically order your list by that column in ascending order. However, click once more and you will see that the column has reordered the list in descending order, with the arrow pointing downwards
will appear. This will automatically order your list by that column in ascending order. However, click once more and you will see that the column has reordered the list in descending order, with the arrow pointing downwards ![]() .
The items will revert to being sorted by code when you navigate elsewhere in Church Windows.
.
The items will revert to being sorted by code when you navigate elsewhere in Church Windows.
You may select another Skill / Interest and continue to add people, or you may click the Groups / Classes tab for
Managing Group Members using Assign Groups & Skills.
